Having the ability to generate electricity completely independent of the grid or any other fuel source is a powerful prep. If you don’t trust your government’s infrastructure to keep things running, then why not use a source of energy that’s completely sustainable, available and free. Machines and technology already help us with every aspect of life. It would be a shame to give up one of the best things mankind has discovered. When the SHTF, I don’t plan live without electricity and neither should you.
In this article, we’ll go through all the steps to estimate an off-grid solar system size. Off-grid solar systems are the most independent of solar power systems, with zero dependence on the grid. The majority of grid-tied systems shutdown with the grid unless otherwise designed.
A calculator is provided for you to play around with different solar system settings to estimate a solar system size. Whether you are planning for your home, RV, or a bug out location, knowing the approximate solar system size can help you determine cost and feasibility.
Table of Contents
Components of an Off-Grid Solar System
An off grid solar system functions completely independently to capture, store, and provide electricity. Before we get to sizing the system, let’s go over the components of an off grid system.
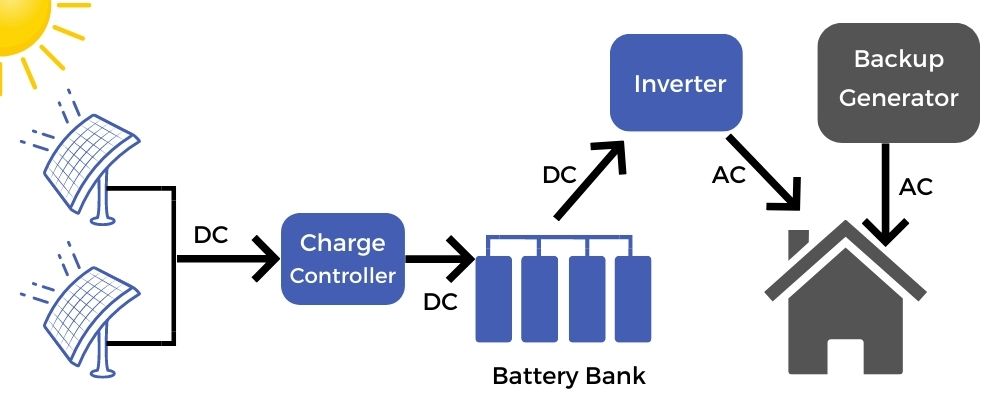
- Solar panels. Solar Panels capture the solar energy from the sun and turn it into electricity that gets stored by the battery bank.
- Charge controller.Charge controllers regulates the voltage and current from the solar panels to protect the batteries from overcharging.
- Battery bank. Batteries store electricity generated by the solar panels. They are essential to using electricity at night or whenever the solar panels aren’t producing.
- Inverter. Converts the solar panel and batteries’ direct current (DC) into an alternating current (AC) that electrical appliances run on.
Step 1: Figure Out How Much Energy You Use In a Typical Day
The first step is to figure out your electricity consumption, aka load size. You can do this by either using your current energy bills from the utility company or by using a load calculator. Once you know your electricity usage, you can begin to plan solar production.
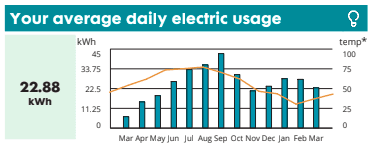
If you are going to use energy bills to figure out your load. You can locate either the average daily electric usage on your bill or the total monthly energy usage.
Below is an example of my monthly energy bill, it tells me my daily kilowatt hour usage is 22.88 kWh for the past month. When I add up this value from the past 12 energy bills and divide the total by 12, I get the average daily kWh usage for the past year.
If your energy bill quotes total energy used by the month, then add up all the monthly kilowatt hours for the past 12 months. Divide the total by 356 to get the estimated daily kilowatt hours you consume.
Alternatively, you can use the following load calculator to estimate energy usage in a 24 hour period. You can itemize every appliance and list their running wattage along with the total number of hours you plan to use it in a 24 hour period. Appliances should all come with an energy label that states the amps and voltage. This method is more useful if you are setting up solar for a new place or you don’t have past energy bills
Total Daily Kilowatt Hours = (Volts X Amps X Runtime in Hours)/1000
Step 2: Determine the Sun Hours
When solar panels are tested and rated, they all undergo testing under standard conditions to produce comparable results. One of the conditions is seeing how much a solar panel can produce when one square meter of that panel is exposed to 1000 watts of sunlight for 1 hour. If the panel produces 300 watts during that hour, then the panel is rated for 300 watts. If it produces 100 watts, then it’s rated for 100 watts.
In the real world, we all get varying degrees of direct sunlight depending on seasonality and location. Regions near the equator typically get more solar energy than places that are near the poles during winter. Other factors such as pollution, local climate can result in very different levels of sun exposure.
Data has shown that sunlight can vary a great deal even amongst places with the same latitude. Sun hours tell us how many hours a day solar panels can expect to receive 1000 kilowatts. To get accurate sun hours for your location, our tool below pulls historical data from the National Solar Radiation Database (NREL) based on your address or zip code.
The average daily solar radiation gives you an estimate of the daily peak sun hours for the address you entered. Peak sun hours is defined as the number of hours in a day where the sun is intense enough to reach 1000 watts per hour. The table above gives you a breakdown of how average peak sun hours vary by month.
To get a rough estimate of solar system size, we can use the average daily radiation to estimate the solar panel output. For example, two identical 100 watt solar panels located in two cities with solar radiations of 3 and 5 will produce 300 watts and 500 watts per day respectively.
The solar radiation data from NREL is especially helpful in estimating winter output. You can even combine information from energy bills and NREL results for corresponding months to see how a system performs throughout the year.
Step 3: Determine the Days of Autonomy
Days of autonomy represent the number of days of backup power you want your batteries to store.
There are two factors that affect this decision. Local weather and cost. Do you live in a place that’s cloudy and rainy? If certain months are filled with gray, stormy days, you will do better with more days of autonomy, 5 or more. If you live in a tropical place that’s sunny all year round, you can probably get away with 2-3 days of autonomy.
Setting higher days of autonomy allows you to keep electrical systems running for more days without sunlight. The limiting factors will be cost and space . More days of autonomy means a larger battery bank and higher capacity equipment which can get expensive. If you are doing a roof mount, you will also be limited by the amount of roof surface area.
Step 4: Using the Solar System Calculator
To use the solar power sizing calculator below, you will need a few of the numbers in previous steps. The first is the estimated daily energy consumption in kilowatt hours from step 1.
Next is the battery type. Lithium and lead acid batteries vary in efficiency, longevity, and price. Lithium is more expensive, more efficient and has a longer lifespan. Lead acid batteries have a depth of discharge of 50% where lithium has a depth of discharge of 80% to 95%. Depth of discharge tells you how much you can draw down a battery from full capacity.
You can also adjust the days of autonomy discussed in step 3. Days of autonomy is the number of days of backup power. More backup days increases the overall solar system size which costs more.
The first result in the calculator below shows the battery bank size. It is calculated based on your daily estimated energy consumption and days of backup power.
Once you have a battery size calculated, enter the average daily solar radiation from step 2. The daily solar radiation tells you how many hours a day your solar panels are expected to receive 1000 watts/hour. Higher solar radiation means more hours of intense sun in your location giving you higher solar production.
Watts per solar panel represent the solar production a chosen model of solar panel can be expected to produce per hour when exposed to a kilowatt of sunlight. Current residential solar panels on the market are rated between 300 to 450 watts.
If you are planning a roof mount and roof space is limited, or if your solar system size is very large, you may want to go with higher watt panels. If the system can generate more watts per panel, it doesn’t need as many panels. The second result shows the number of solar panels you need.
Choosing the Charge Controller
The charge controller acts as a gatekeeper between the solar array and the battery bank to prevent voltage and current spikes from damaging the batteries.
Cold temperatures can cause a significant surge in solar panel voltage. If you live in a place that experiences cold temperatures, please use the following calculator to see how high voltages can spike.
You’ll need the technical specs of solar panels that you are considering as well as the record low temperature in your region.
Once you have the potential voltage surge of solar panels. You can figure out the total voltage that would enter the charge controller by multiplying the surge voltage by the number of solar panels you plan to connect in series. Your charge controller’s allowable input voltage must be higher than the solar array total output voltage.
Choosing an Inverter
When selecting an inverter, make sure it fulfills the following requirements of your solar system.
- The input voltage of the inverter should match the voltage of your solar power system.
- The output voltage should match the voltages of appliances that you are running. If the inverter is going to hook into the electrical panel of a house, make sure its output voltage matches the local grid. Grid voltage is 120 V in North America or 240 V in Australia, Africa, or Europe.
- You also want to make sure that the inverter can handle peak watts that are greater than the total load you run. If you are running appliances that have motors and compressors, make sure you incorporate surge watts into the load calculation.
Additional Considerations in Designing a Solar System
Knowing your approximate solar system size is useful in getting you started with cost and space planning. Factors that are beyond the scope of this article can impact solar system output quite a bit. Depending on the types of components used, solar system losses can vary by over 30%.
Another factor that can impact solar production is the way solar panels are oriented and tilted. Solar panels produce the most power when sunlight strikes vertically at a 90 degree angle. Folks who live in the Northern Hemisphere will see the sun due south low in the sky during winter months.
During the summer months the sun is more or less directly overhead. If possible, adjusting the solar panel tilt twice a year, in spring and fall, to help your solar panels capture more power.
Conclusion
Estimating solar system size involves many moving parts. The tools and calculators provided here should be a good place to help anyone considering solar systems get started. It’s important to remember that it all boils down to energy consumption vs energy production.
Solar panel size, battery capacity, daily peak sun hours are part of the energy production side. On the other hand, daily energy consumption and days of autonomy are part of the consumption side. All you are doing in the designing process is balancing the two sides out.